Rooflights in plain clay tile roofs
Plain clay tile is the covering that makes a rooflight installation take longer than the customer expects, and the reason is the double lap. A plain tile is a small flat rectangle with no interlock, so the roof is made watertight by covering every joint twice: at any point on the slope there are three thicknesses of tile, laid at a 100mm gauge with the joints bonded halfway across the tile below. Nothing on that roof is a single module you can lift out. Every tile is held down by the two above it, and the two above those. Put an opening in the middle of it and the covering has to come back a long way, the battens are at four inch centres so a dozen of them get cut, and the tiles that finish against the frame have to keep a bond that the frame has just interrupted. It is a fine roof to work on and it rewards a slow morning. The wider sequence is on the roof window installation page.
Three thicknesses of tile, and what the double lap costs at an opening
On a single lap covering the tile above overlaps the one two courses down by nothing at all, because the sideways joint is closed by an interlock. A plain tile has no interlock, so the joint between two tiles in a course is closed by the tile sitting over it in the course above, and the joint in that course is closed by the one above that.
The arithmetic at an opening follows directly. To free the head of a new frame you cannot simply lift the course immediately above it. You lift that course, and the course above that, and usually one more to get working room, because each of them is nailed or hung over the tiles you are trying to reach. A 1180mm tall window on a 100mm gauge has around twelve courses across its height and needs perhaps three more above and two below released. That is a lot of tiles on the scaffold, and it is the single biggest programme difference between this covering and an interlocking one.
265 by 165, a 100mm gauge and a 65mm lap
The standard plain tile has been 265mm long by 165mm wide since the nineteenth century, and a great deal of the vale is covered in exactly that. The gauge is worked out from the length and the lap: subtract the headlap from the tile length and halve the remainder, so a 265mm tile at a 65mm lap gives a 100mm gauge.
Increase the lap and the gauge shrinks, which is what happens on an exposed slope or a shallower pitch. A 75mm lap on the same tile gives a 95mm gauge and roughly five per cent more tiles per square metre. This matters at a rooflight because the head flashing has to disappear under a course, and where the frame head lands relative to that 95 or 100mm rhythm decides whether there is a sensible amount of tile to tuck under or almost none. Gauge is measured over ten courses on the actual slope and divided, never assumed.
Broken bond, and the tile-and-a-half that keeps it
Plain tiling is laid in a half bond: each course is offset by half a tile width so no vertical joint ever lines up with the one below. Break that bond and you have created a continuous vertical channel straight down the roof.
A rooflight frame interrupts the bond in both directions. On each side of the opening the courses now terminate against a vertical line, and alternate courses will finish with a half tile at that line. A half tile has one nail hole and one nib at best, and often neither. The answer the trade has used for a century is the tile-and-a-half: a purpose made unit 248mm wide with two nail holes and two nibs, used in alternate courses so every course terminates in a properly fixed piece. It is not an optional refinement beside an opening. It is how the covering keeps working.
Camber, and why a plain tile roof is never actually flat
A plain tile is not a flat plate. It has a longitudinal camber, a slight curve along its length of around 10 to 15mm, and a good handmade tile often has a cross camber as well. The camber lifts the tail of each tile clear of the one below, which breaks capillary action in the lap and lets air move under the covering.
It also means the surface of the roof is gently corrugated at a scale of one tile. Lay a flat lead apron straight onto that surface and it bridges the cambers and rocks. The apron has to be dressed down onto the tails, worked into the shallow hollow of each tile it crosses, which is bossing work rather than a matter of laying a strip down. On a hand made tile with a pronounced camber this is real work and it is one of the things that separates a good apron from one that whistles in a gale.
Nibs, nail holes, and tiles that are already ninety years old
A plain tile hangs on two moulded nibs at the head and has two nail holes beside them. Traditional practice nailed every fourth or fifth course and relied on the nibs elsewhere. Current practice under British Standard 5534 fixes far more, and every perimeter tile without exception.
Old tiles break at the nibs. A clay tile that has been on a Gloucester roof since 1890 is often laminating at the head, and levering it off a batten snaps a nib in a way that is completely invisible until the tile is turned over. A realistic breakage rate on a Victorian plain tile roof being stripped back around an opening is high enough that matching replacements are sourced before the work starts rather than afterwards. A tile lifter, worked under the tile to disengage the nib rather than levering on the tail, keeps the number down. Nails are copper or aluminium, never plain steel, because a steel nail in a damp clay tile roof rusts and stains.
Battens at 100mm centres, and the dozen you have just cut
This is the structural point that gets missed. On an interlocking roof at a 345mm gauge, an 1180mm opening cuts three or four battens. On plain tile at a 100mm gauge the same opening cuts around twelve.
Every one of those cut battens now has an unsupported end beside the opening, and each of them is carrying tiles. The correct detail is that the battens are cut back to land on the trimmed opening’s side timbers and fixed there, so each batten end bears properly, and the tile-and-a-half units at the perimeter are nailed into sound timber rather than into a batten end floating in space. Where a batten is left short and unsupported, the tiles hanging on it drop by a few millimetres over a winter and the line of the courses beside the window goes visibly out of true. It is a small detail with a very visible consequence.
Weight: the heaviest common covering in the vale
Plain clay tiling is heavy. A double lap plain tile roof runs somewhere around 65 to 78 kilograms per square metre once battens and membrane are included, against roughly 45 to 55 for concrete interlocking tile and around 35 for natural slate.
That figure goes into the trimming calculation. It also explains why Victorian plain tile roofs in Gloucester are built with generous rafters and a purlin at mid span. The practical consequence at survey is that when a designer sizes a head and cill trimmer for an opening, the covering weight is one of the inputs, and quoting a plain tile roof as though it were slate understates the load by a factor of two. The structural side is set out on trimming rafters for a pitched roof rooflight.
Minimum pitch, and the vale rear addition that sits under it
Plain tile needs pitch. The usual published minimum is 35 degrees, and 40 degrees is where the covering is comfortable, because a flat tile with only a 65mm lap and no interlock relies entirely on gravity to move water off it.
Gloucester’s Victorian terraces mostly oblige on the main roof, which runs at 40 to 45 degrees. The rear addition does not. A two storey rear addition with a lean-to at 25 to 30 degrees is common through the city and through Tewkesbury, and where somebody has covered one in plain tile it is already working below its designed pitch. Putting a rooflight into that slope means increasing every flashing lap over the published minimum rather than taking the standard kit dimensions, and being honest at survey that the covering, not the window, is the limiting factor. Where the pitch drops below 15 degrees the unit changes type entirely, which is covered on rooflights on a shallow pitch below 15 degrees.
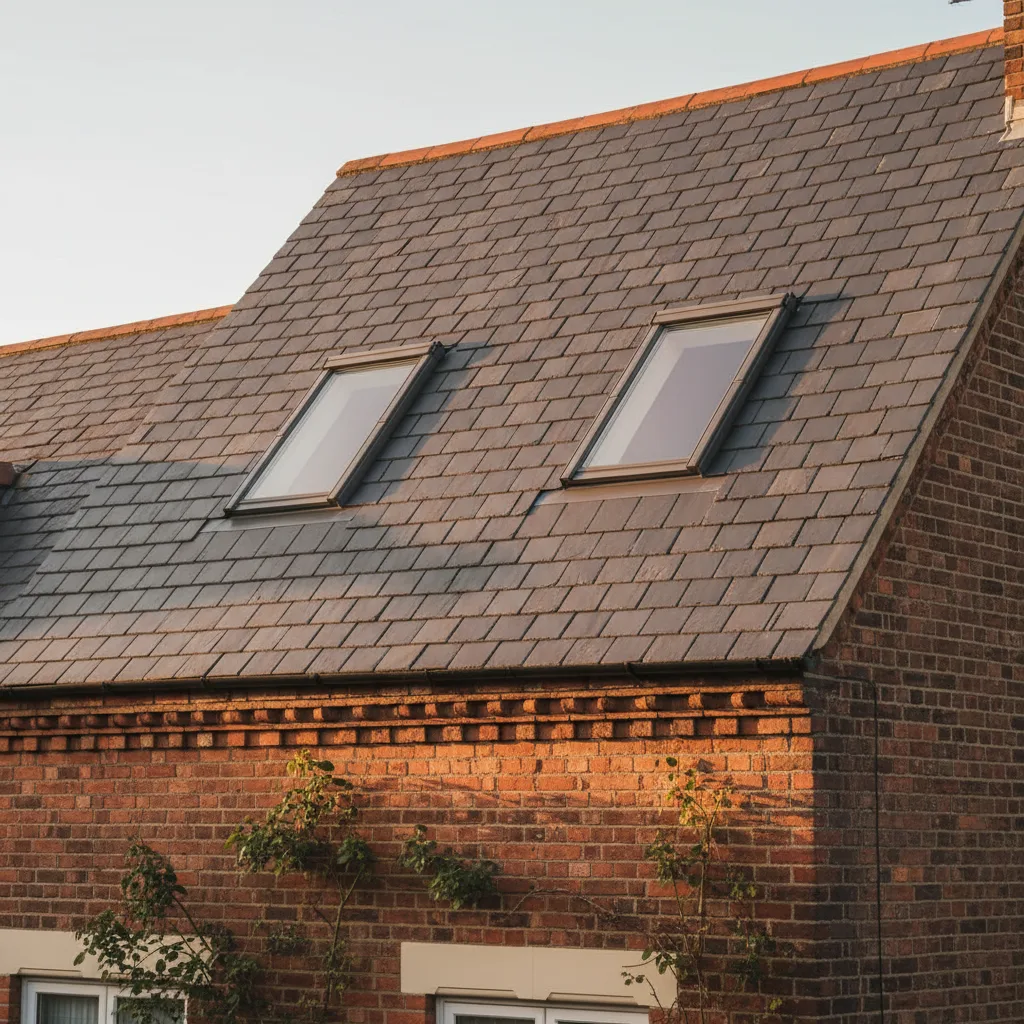
How far the covering actually has to come back
Working figures for a 780 by 1180 unit, from experience rather than from a manual.
| Direction | Interlocking tile | Plain clay tile | Why the difference |
|---|---|---|---|
| Above the head | Two courses, about 700mm | Five to six courses, about 550mm of slope but far more tiles | Each course is held by the two above it |
| Below the cill | Two courses | Three to four courses, so the apron lands on doubly lapped tile | The apron has to reach past a full lap |
| Each side | One to two tiles | Two to three tiles, alternating on the bond | Broken bond means alternate courses stop differently |
| Tiles handled | Perhaps forty | Comfortably two hundred | Tile face area is about a sixth |
| Breakage expected | Low, and matching is a colour problem | Higher on old handmade stock, and matching is a size problem too | Nib laminating with age |
None of this makes plain tile a difficult covering. It makes it a slower one, and the estimate says so rather than discovering it on the second morning.
Soakers cut for a double lap, and the apron that reaches further
Because the tile is flat and thin, the side detail is interleaved soakers rather than a continuous flashing, one per course, each lapping the one below by the same 65 or 75mm the tiles lap. At a 100mm gauge that is a lot of small pieces, all cut on the scaffold.
The soaker for a plain tile roof is cut deeper than the equivalent for slate, because it has to reach up behind two courses rather than sit under one. And the apron at the cill has to be dressed far enough down the slope that its lower edge finishes over a tile that is itself doubly lapped, which on a 100mm gauge means reaching past two full courses. A short apron on a plain tile roof looks fine on the day and delivers water onto the head of a tile that has nothing under it. What each of the three flashing components is doing is set out on soakers, aprons and head flashings explained.
Handmade Severn Vale clay against machine made tile
The two behave differently and the difference shows at an opening. A machine made plain tile, wirecut or pressed, is dimensionally consistent to within a millimetre or two, sits flat in a stack, and cuts cleanly on a disc.
A handmade sand faced tile, which is what covers a good deal of older vale housing and the better village work around Newent and Ledbury, varies by several millimetres in every dimension, has an irregular camber, and carries a sand finish that abrades. Laid as a roof that variation is what gives the surface its texture. Laid against a straight aluminium frame it means every course terminates at a slightly different point, and the soakers are cut individually rather than as a batch. Cutting a handmade tile also destroys the sand face along the cut, leaving a raw clay edge that shows pale for a couple of years until it weathers.
Staffordshire blue, red vale clay, and matching an old roof
Colour on a clay roof is genuinely permanent, unlike the pigmented surface on a concrete tile, which makes matching both easier and harder. Easier because a reclaimed clay tile of the right type will still be the right colour in fifty years. Harder because the range within one old roof is wide.
Gloucester’s terraces carry a mixture: local red vale clay, Bristol and Cattybrook reds brought up the river, and Staffordshire blue on the better late Victorian work and on many bay window roofs. Blues and reds were often used together deliberately, in bands or diaper patterns, and an opening that removes part of a decorative band has to put it back correctly. Photographing the slope before a tile is touched, at a resolution that lets the pattern be counted afterwards, takes two minutes and settles an argument that is otherwise unwinnable.
Sourcing reclaimed tiles, and sorting them on the ground
Reclaimed plain tiles are widely available across the county, and the work is in the sorting rather than the buying. A pallet of reclaimed tile arrives with a spread of sizes, cambers, colours and conditions, and perhaps a fifth of it is only fit for the bottom of a stack.
Sorting happens on the ground before anything goes up: sound nibs in one pile, single nib and nail-fixable in another, laminating tiles rejected. Then the sound tiles are sorted by size, because a 262mm tile and a 268mm tile in the same course will not keep a line. The best material goes into the courses immediately around the window where the eye lands, and the ordinary material goes further away. Lead times on matched reclaimed stock are the reason a plain tile job is booked with more notice than a concrete tile one.
Under-eaves tiles, top course tiles and the short tiles in the set
A plain tile roof uses more than one length. The eaves course is doubled with a short under-eaves tile of around 190mm, and the course below the ridge uses a short top course tile so the final gauge works out. Both exist because the double lap has to be maintained where the slope starts and finishes.
An opening set close to the eaves or close to the ridge runs into them. Near the eaves the apron may be landing on a doubled course, which is actually helpful. Near the ridge the head flashing may have to tuck under a top course tile that is shorter than the flashing needs, and there the frame is moved down a course or two at setting out rather than fought with. Clearances from the ridge, verge and valley are set out on the roof window installation page.
Torching, and the plain tile roofs that still have it
Torching is not only a stone slate detail. Plenty of Gloucester and Tewkesbury plain tile roofs from before about 1900 were torched from below with lime mortar and hair, with no membrane at all, and the mortar is what stopped snow and dust blowing through.
Where an opening disturbs it, the torching cannot be put back as it was, and the replacement is a vapour permeable membrane across the area being worked, agreed in advance where the building is listed or in a conservation area. The membrane detail, including the tongue over the head of the frame and the flaps into the frame channel, is on underlay and sarking around a pitched rooflight. Old torching also tells you something useful: a roof with intact torching has usually not been stripped in a century, so the battens beneath it are riven or sawn softwood of unknown grade and get inspected rather than trusted.
A Tewkesbury rear slope, worked through
A 1900 terrace, main rear slope at 42 degrees, red vale clay plain tile at a measured 98mm gauge and 165mm wide, rafters at 400mm centres, purlin low in the slope, three metres from gutter to ridge.
A 780 by 1180 unit sits above the purlin with room to spare. Across the width, 800mm of opening on a 165mm module puts the frame roughly two thirds of the way across a tile on each side, so alternate courses will terminate in a tile-and-a-half and the others in a full tile with a modest cut. Twelve battens are cut and each gets bearing on the side timbers. Around 220 tiles come off, of which perhaps 25 will not go back. Those are matched from reclaimed stock sorted the week before. The unit itself takes an hour. The covering either side of it takes the rest of the day, which is exactly the right way round.
What the survey measures on a plain clay tile roof
The list is longer than for an interlocking roof, and every line has a consequence.
- Tile length and width measured on a sample, and whether the stock is handmade or machine made.
- Gauge over ten courses, and the headlap that implies.
- Pitch off a digital level, checked against the 35 degree minimum.
- Camber, judged on a loose tile, because it decides how much bossing the apron needs.
- Nib condition on a sample of tiles lifted from a hidden area.
- Existing fixing pattern: which courses are nailed, and with what.
- Whether tile-and-a-half units already exist at the verges, and in what size.
- Colour range and any decorative banding, photographed before work.
- Presence of torching, and the membrane strategy that will replace it.
- Batten condition and section, seen from inside where possible.
Those ten lines produce a tile order, a soaker schedule, a programme and a figure. Plain clay tile is a covering worth doing properly, and it makes a rooflight look as though it has always been there once the courses are back and bonded. How the range and then the fixed price are arrived at is on the costs page.
Next on this subject.
- Guide Trimming rafters for a pitched roof rooflight Trimming is the carpentry that lets a hole exist in a sloping roof without the roof noticing. A rafter is…
- Guide Rooflights in a trussed roof and what cannot be cut A trussed roof is not a set of rafters that happen to be joined together. It is a series of…
- Guide Soakers, aprons and head flashings explained A flashing set around a pitched roof rooflight is three separate components doing three separate jobs, and confusing them is…
- Guide Rooflight reveals and why splaying them matters The reveal is the plastered box between the frame of a rooflight and the ceiling of the room, and it…
- Guide Two rooflights side by side on one slope Two roof windows side by side on one slope is usually a better answer than one wide unit, and on…
- Guide Rooflights on a shallow pitch below 15 degrees Below fifteen degrees a pitched roof stops behaving like a pitched roof, and the whole approach to glazing it changes.…